Creating Event-Driven Applications with Azure Event Grid and C#
Event-driven architecture (EDA) is a powerful paradigm that allows applications to react to changes or events as they happen. Azure Event Grid is a fully-managed event routing service that provides a reliable way to react to events in a decoupled manner. In this blog post, we’ll explore how to create an event-driven application using Azure Event Grid and C#.
Understanding Event-Driven Architecture
EDA is a design pattern where decoupled components in a system communicate through the production, detection, consumption, and reaction to events. An event is a significant change in state, such as a new order placed, a customer signing up, or a payment being processed.
Key Benefits of Event-Driven Architecture:
- Decoupling: Producers of events (publishers) and consumers (subscribers) are decoupled, meaning they do not need to know about each other. This allows for more flexible and maintainable systems.
- Scalability: EDA enables systems to scale more efficiently by handling events asynchronously and distributing workload across multiple consumers.
- Responsiveness: Systems can react to events in real-time, providing a more responsive user experience.
- Extensibility: New event consumers can be added without altering the existing producers, making the system easier to extend and evolve.
Azure Event Grid Overview
Azure Event Grid is a fully managed event routing service that allows for the creation of event-driven applications. It provides reliable delivery of events with high availability and a built-in mechanism for retrying event deliveries in case of failures.
Key Features of Azure Event Grid:
- Event Routing: Routes events from publishers to subscribers.
- High Throughput: Capable of handling millions of events per second.
- Built-in Retry Mechanism: Ensures that events are reliably delivered.
- Flexible Filtering: Allows for fine-grained filtering of events based on event type, subject, and data.
- Integration with Azure Services: Seamlessly integrates with other Azure services like Azure Functions, Logic Apps, and Azure Automation.
Key Concepts of Azure Event Grid
- Event Sources: These are the sources that generate events. Event sources can be various Azure services such as Blob Storage, Resource Groups, and custom applications.
- Event Handlers: These are the endpoints or services that consume the events. Examples include Azure Functions, Logic Apps, and custom webhooks.
- Event Schema: The structure of an event which includes information such as the event type, subject, data, and event time.
- Topics: A topic is an endpoint where publishers send events to. It acts as a central point that receives all the events and routes them to the appropriate subscribers.
- Event Subscriptions: These define the events of interest and the endpoint where these events should be sent. They can filter events based on specific criteria.
When to Use Azure Event Grid
- Real-Time Processing: When you need to react to events in real-time, such as updating an inventory system immediately after an order is placed.
- Decoupled Systems: When building systems where producers and consumers of events should be decoupled to allow independent scaling and development.
- Event Routing: When you need to route events to different services or applications based on specific criteria.
- Serverless Architectures: When using serverless compute options like Azure Functions or Logic Apps to handle events.
- Complex Event Processing: When you need to process complex event patterns and workflows across different services and applications.
Understanding Event Grid Topics
An Event Grid Topic is a user-defined endpoint to which event publishers send their events. Topics act as central hubs that manage the flow of events from the publishers to the subscribers.
Why Use Event Grid Topics?
- Centralized Event Management: Topics provide a central place to manage and route events.
- Scalability: Topics can handle millions of events per second, making them suitable for high-scale applications.
- Flexibility: Topics support custom event schemas, allowing you to define events that suit your application needs.
Key Concepts of Event Grid Topics
- Custom Topics: These are user-defined topics that you create for custom event routing. You can create custom topics to handle events specific to your application.
- System Topics: These are built-in topics provided by Azure services like Blob Storage, Azure Resource Groups, and more. System topics automatically publish events related to the specific Azure service.
- Publishing Events: Publishers send events to the topic endpoint. Each event includes information such as the event type, subject, data, and event time.
- Event Filtering: Subscribers can define filters to specify which events they want to receive. Filters can be based on event type, subject, or other properties.
Example Application Scenario
Imagine an online retail system that needs to perform various actions when a new order is placed, such as sending a confirmation email. We can achieve this by using Azure Event Grid to route the order events to different subscribers.
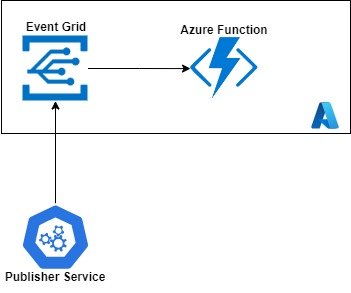 Sample Architecture
Environment Setup
1. Setting Up Azure Event Grid
First, we need to create an Event Grid Topic in Azure. This topic will be the central place where all events are sent.
- Create Event Grid Topic:
- Go to the Azure portal.
- Search for
Event Grid Topicsand click on it. - Click on
+ Createand fill in the necessary details. - Click
Review + Createand thenCreate.
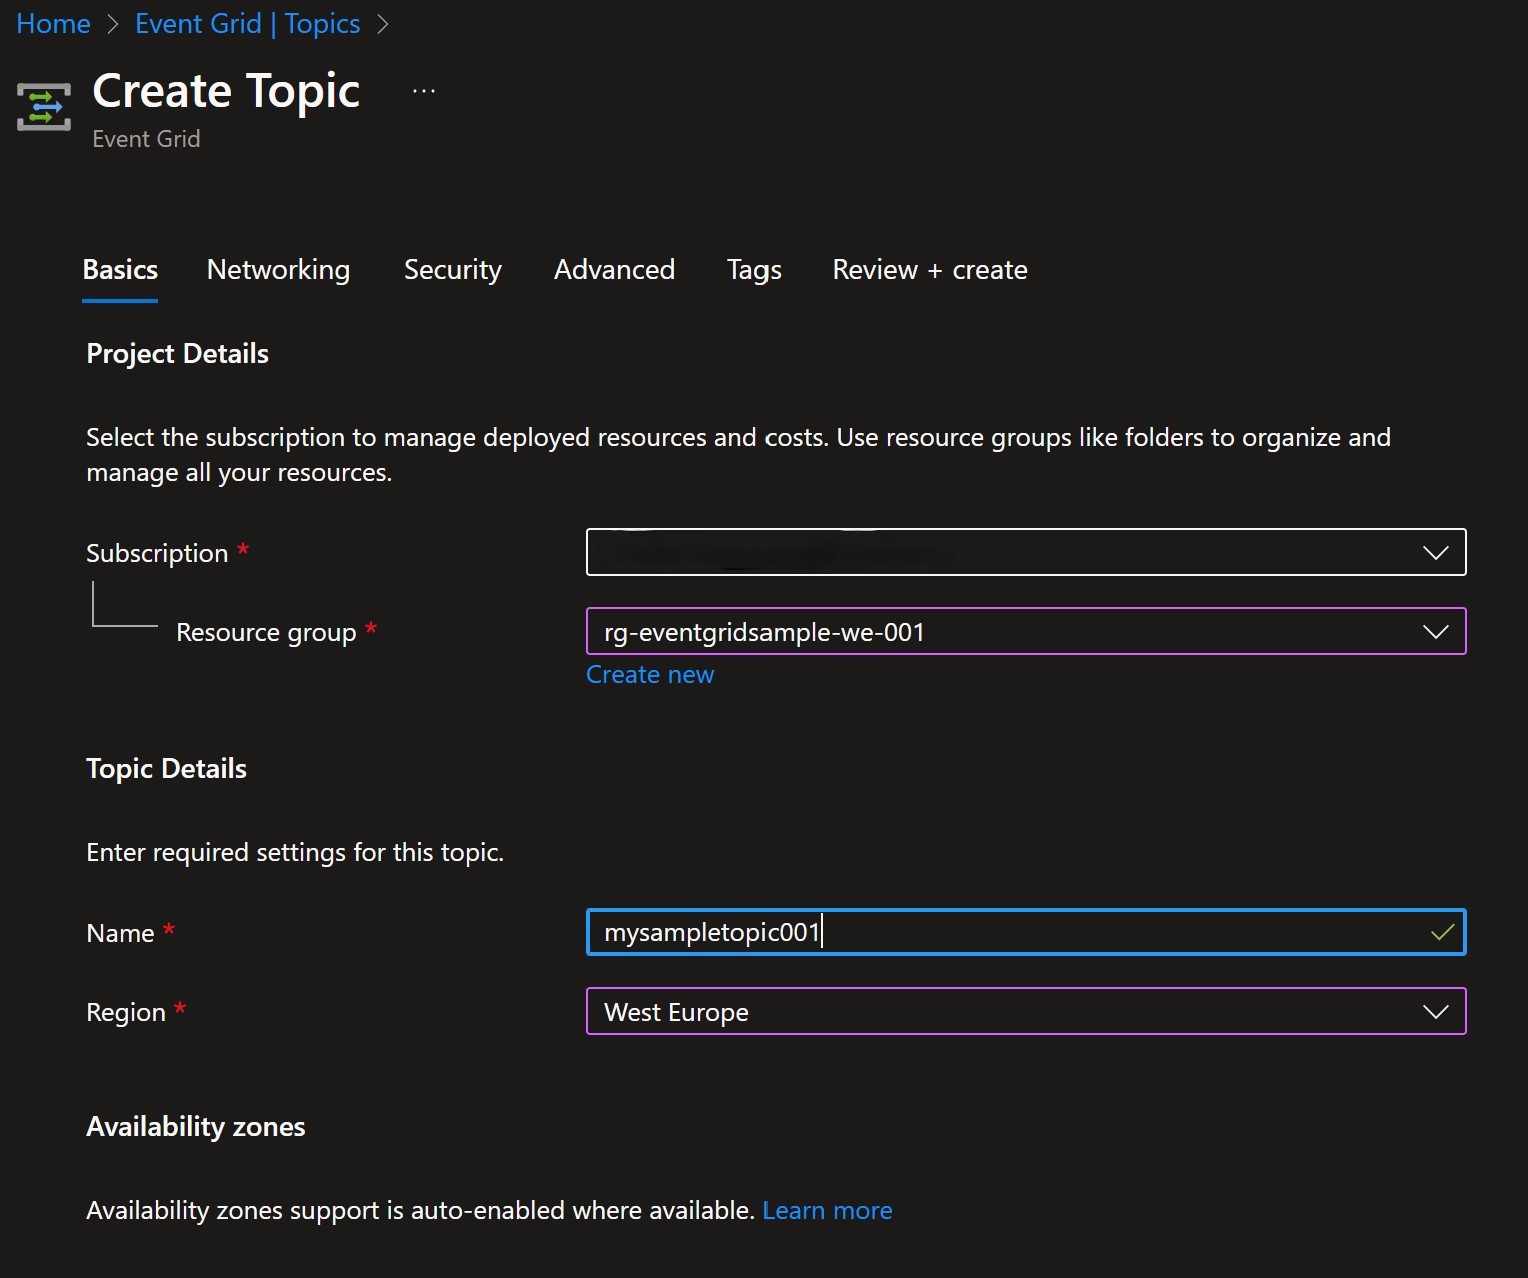 Create Event Grid Topic
- Get Topic Endpoint and Key:
- Once the topic is created, go to the resource.
- Copy the
Topic EndpointURL. - Under the
Settingssection, go toAccess keysand copy one of the keys.
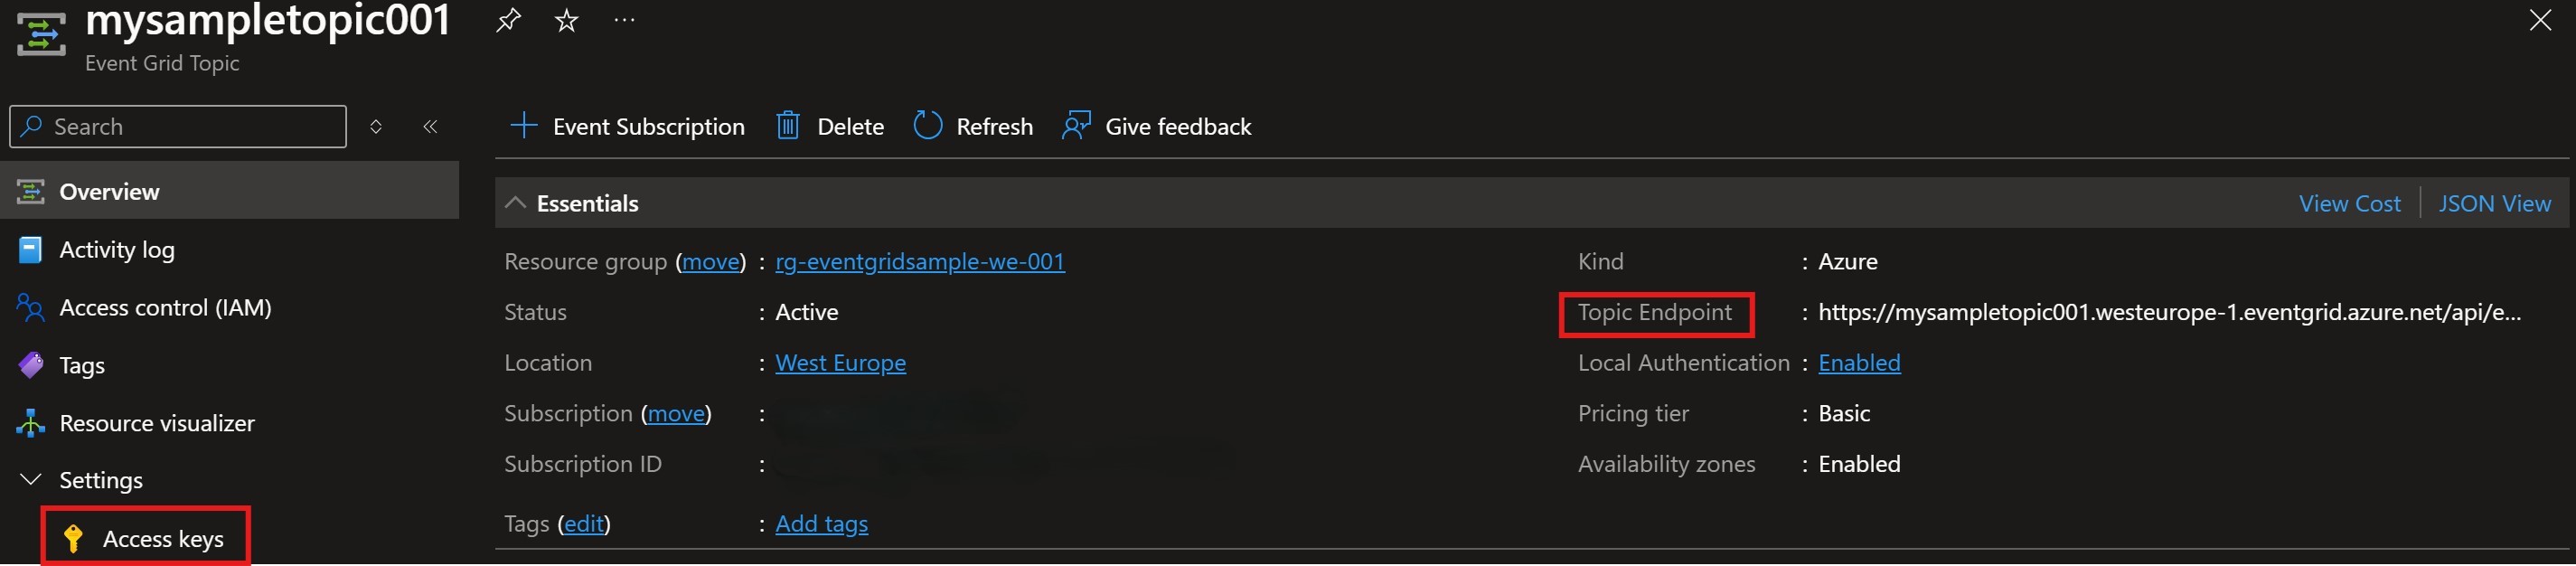 Get Topic Endpoint and Key
2. Creating a .NET Core Console Application
The EventGridPublisherClient class in the Azure.Messaging.EventGrid library provides a modern and efficient way to interact with Azure Event Grid. It is designed to simplify the process of sending events to Event Grid topics by abstracting the complexities of the underlying HTTP requests and providing a simple, programmatic interface for developers.
Create a new .Net Console application and use the following code. Use the Topic Endpoint URL and Key from previous step:
1
2
3
4
5
6
7
8
9
10
11
12
13
14
15
16
17
18
19
20
21
22
23
24
25
26
27
28
29
30
31
32
33
34
35
36
37
38
39
40
41
42
43
44
public class EventGridPublisherService : IPublishOrders
{
    private readonly EventGridPublisherClient _client;

    public EventGridPublisherService(IConfiguration configuration)
    {
        var endpoint = new Uri(configuration["TopicEndpoint"]);
        var credentials = new AzureKeyCredential(configuration["TopicKey"]);
        _client = new EventGridPublisherClient(endpoint, credentials);
    }

    /// <summary>
    /// Publishes an order as an event to the Event Grid service.
    /// </summary>
    /// <param name="order">The order to be published.</param>
    /// <returns>A task representing the asynchronous operation.</returns>
    public async Task Publish(Order order)
    {
        var orderEvent = new EventGridEvent(
                    subject: $"Order.{order.Id}.{order.Action}",
                    eventType: $"Order.{order.Action}",
                    dataVersion: "1.0",
                    data: order);

        await _client.SendEventAsync(orderEvent);
    }

    /// <summary>
    /// Publishes a batch of orders as events to the Event Grid service.
    /// </summary>
    /// <param name="orders">The list of orders to be published.</param>
    /// <returns>A task representing the asynchronous operation.</returns>
    public async Task PublishBatch(List<Order> orders)
    {
        var events = orders
            .Select(order =>
                new EventGridEvent(subject: $"Order.{order.Id}.{order.Action}",
                    eventType: $"Order.{order.Action}",
                    dataVersion: "1.0", data: order))
            .ToList();

        await _client.SendEventsAsync(events);
    }
}
Best practices for working with Event Grid and the provided code:
- Use a configuration file or environment variables to store sensitive information like the endpoint URI and credentials instead of hardcoding them in the code.
- Consider implementing error handling and retry logic when sending events to handle transient failures or network issues.
- Validate the input data before publishing events to ensure that it meets the expected format and requirements.
- Follow naming conventions and use descriptive names for events, subjects, and event types to make it easier to understand and manage the events.
- If you have multiple events to publish, you can batch them together and send them in a single call to improve performance and reduce network overhead.
3. Creating an Azure Function as Event Subscriber
Azure Functions is a serverless compute service that allows you to run event-driven code without having to explicitly provision or manage infrastructure. When combined with Azure Event Grid, Azure Functions becomes a powerful tool for creating reactive, event-driven applications. Event Grid allows you to route events from multiple sources to Azure Functions, enabling you to build scalable and decoupled systems.
Benefits of Using Azure Functions as Event Grid Subscribers:
- Scalability: Azure Functions automatically scales based on demand, handling any number of events without any manual intervention.
- Cost-Efficiency: With a pay-per-execution pricing model, you only pay for what you use, making it cost-efficient for handling sporadic or unpredictable workloads.
- Simplified Development: Built-in triggers for Event Grid and a wide range of other services simplify the development of event-driven applications.
To create a new Azure Functions project:
- Create a new project in Visual studio 2022,
- Search for
Azure Functionsand select the “Azure Functions” template. - In the “Additional Information” window, select
Event Grid triggerfor the trigger type, - Click
Create, - Update the code:
1
2
3
4
5
6
7
8
9
10
11
12
13
14
15
16
17
18
19
20
21
22
23
24
25
26
27
28
29
30
public class SendNotification
{
    private readonly ILogger<SendNotification> _logger;

    public SendNotification(ILogger<SendNotification> logger)
    {
        _logger = logger;
    }

    [Function(nameof(SendNotification))]
    public void Run([EventGridTrigger] EventGridEvent eventGridEvent)
    {
        _logger.LogInformation("Event type: {type}, Event subject: {subject}", eventGridEvent.EventType, eventGridEvent.Subject);

        var receivedOrder = eventGridEvent.Data.ToObjectFromJson<Order>();

        switch (eventGridEvent.EventType)
        {
            case "Order.Created":
                _logger.LogInformation($"Sending notification mail for order created event with Id: {receivedOrder.Id}");
                break;
            case "Order.Updated":
                _logger.LogInformation($"Sending notification mail for order updated event with Id: {receivedOrder.Id}");
                break;
            case "Order.Deleted":
                _logger.LogInformation($"Sending notification mail for order deleted event with Id: {receivedOrder.Id}");
                break;
        }
    }
}
- Publish the Function: Right click the Function project -> select publish -> Azure -> Azure Function App (Windows) -> Create a new Function -> Fill in the necessary info -> Generate .pubxml file -> Publish using the created profile.
You can find the complete code available in github. In EventPublisherProject, complete the TopicKey and TopicEndpoint in the appsettings.json file.
4. Creating Event Subscription with Filtering
We will now create a subscription for the Event Grid Topic and apply filters to ensure only relevant events are handled by each Azure Function.
Navigate to the Event Grid Topic in the Azure portal.
- Click on
+ Event Subscription. - Fill in the details:
- Name: SendNotificationFunctionSubscription
- Event Schema: Event Grid Schema
- Endpoint Type: Azure Function
- Endpoint: Select the deployed Azure Function.
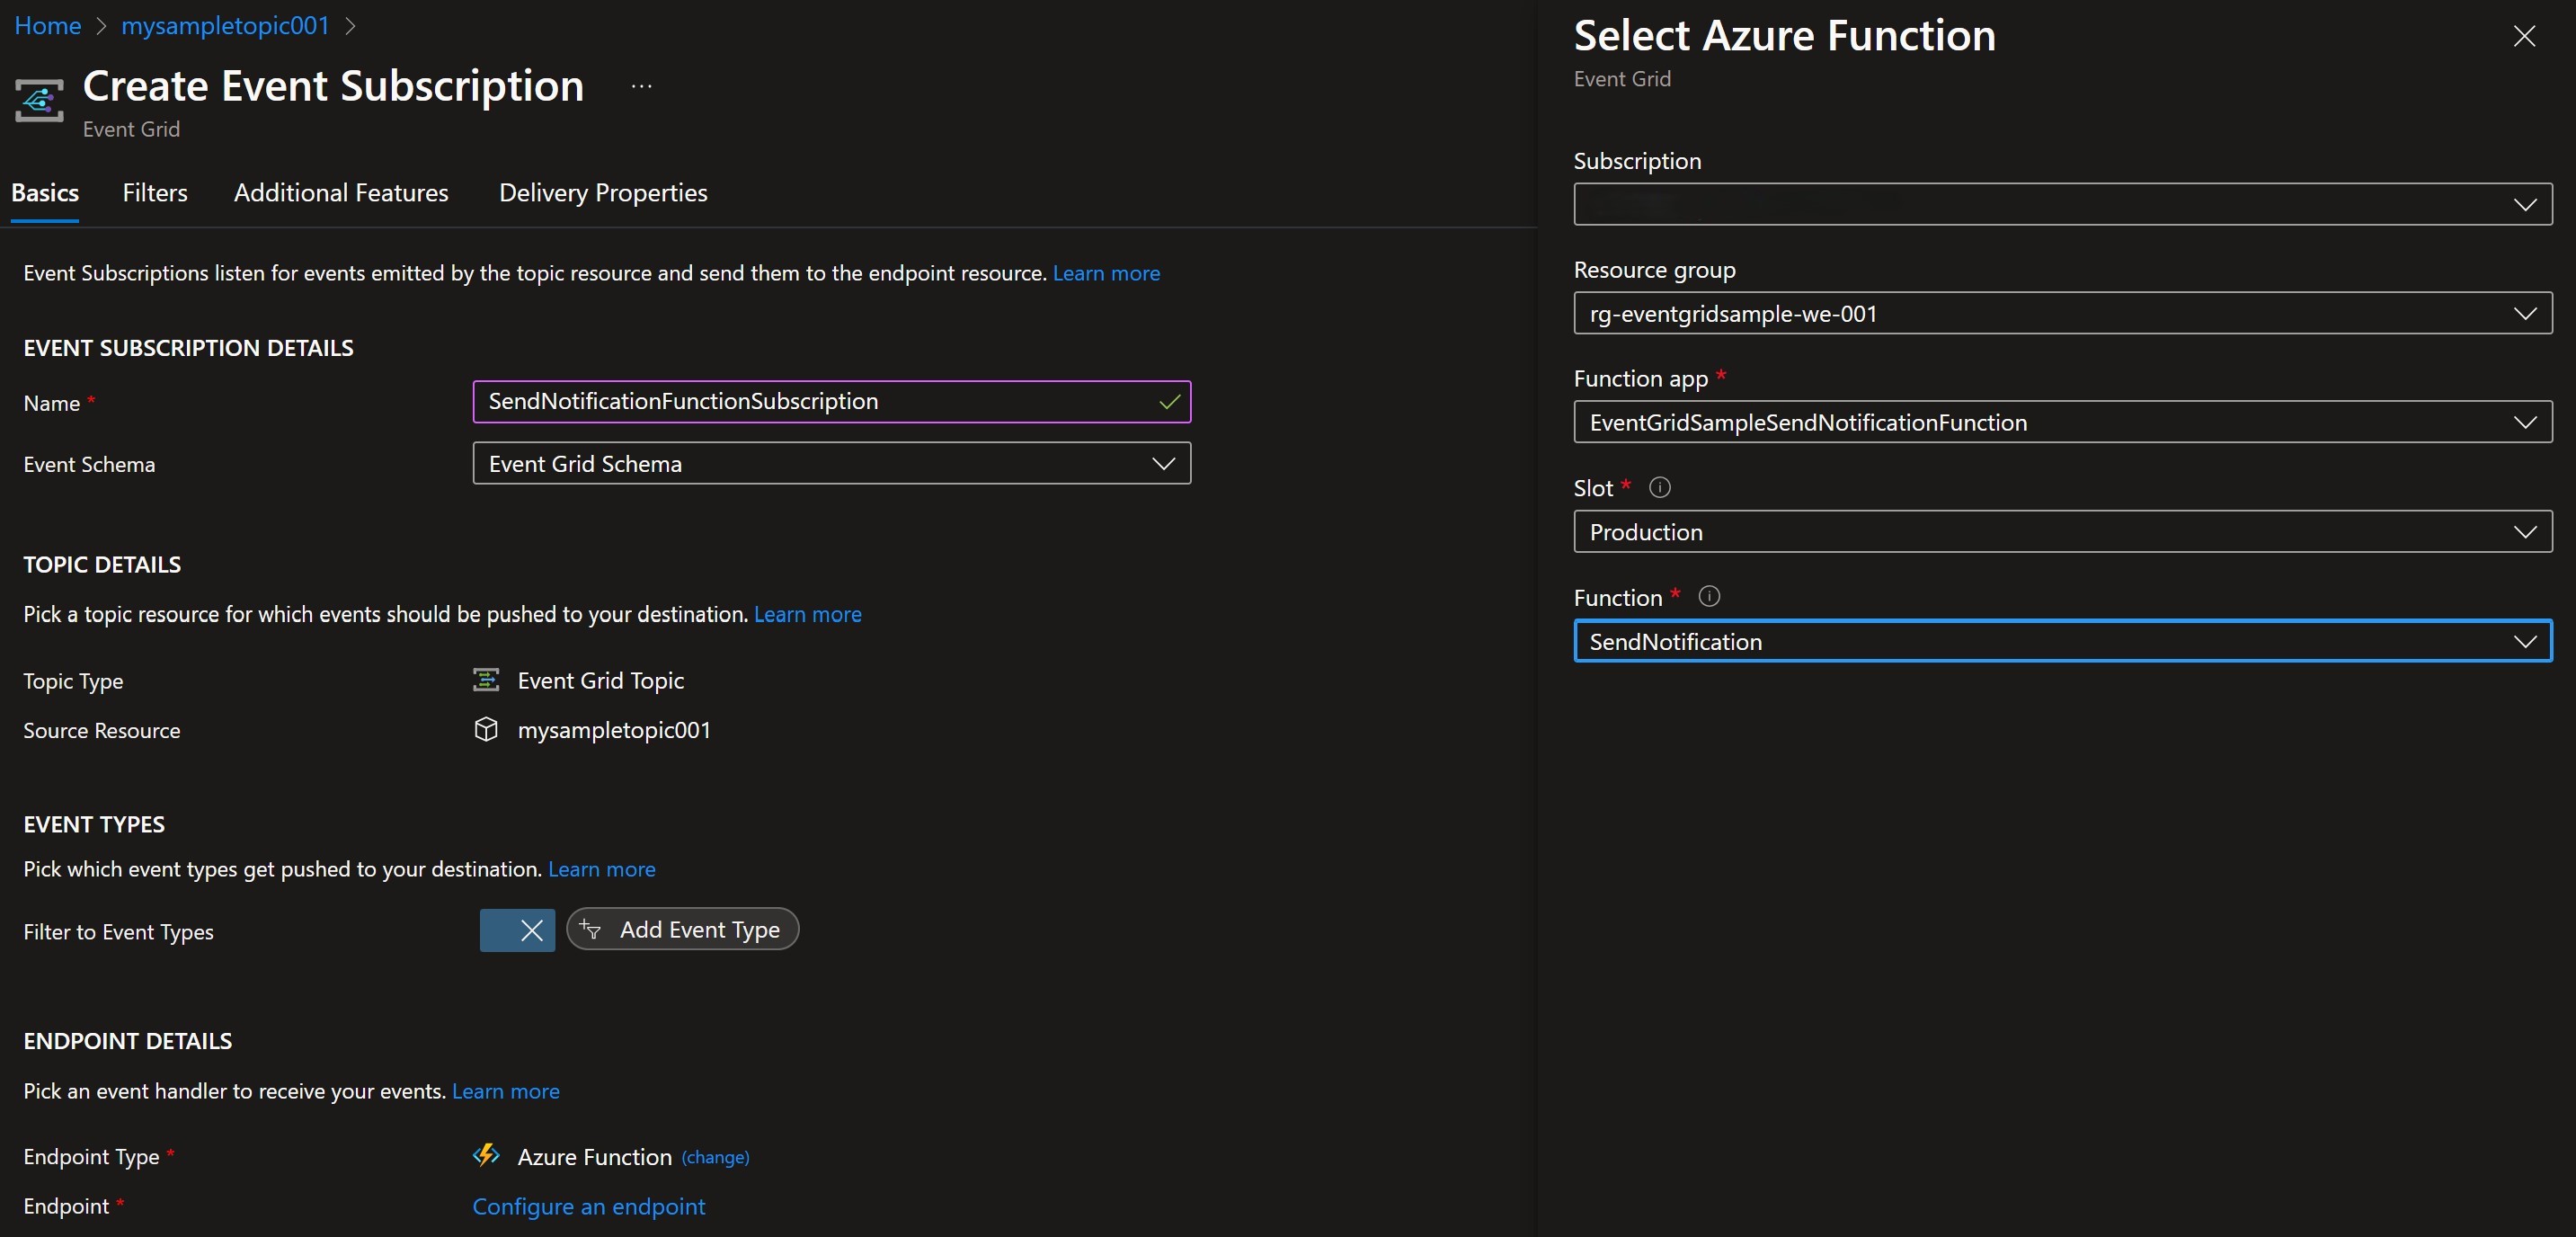 Subscription Details
- Under
Filters,Subject FiltersselectEnable Subject Filteringand fill in theSubject Begins With(For our example with value “Order”)
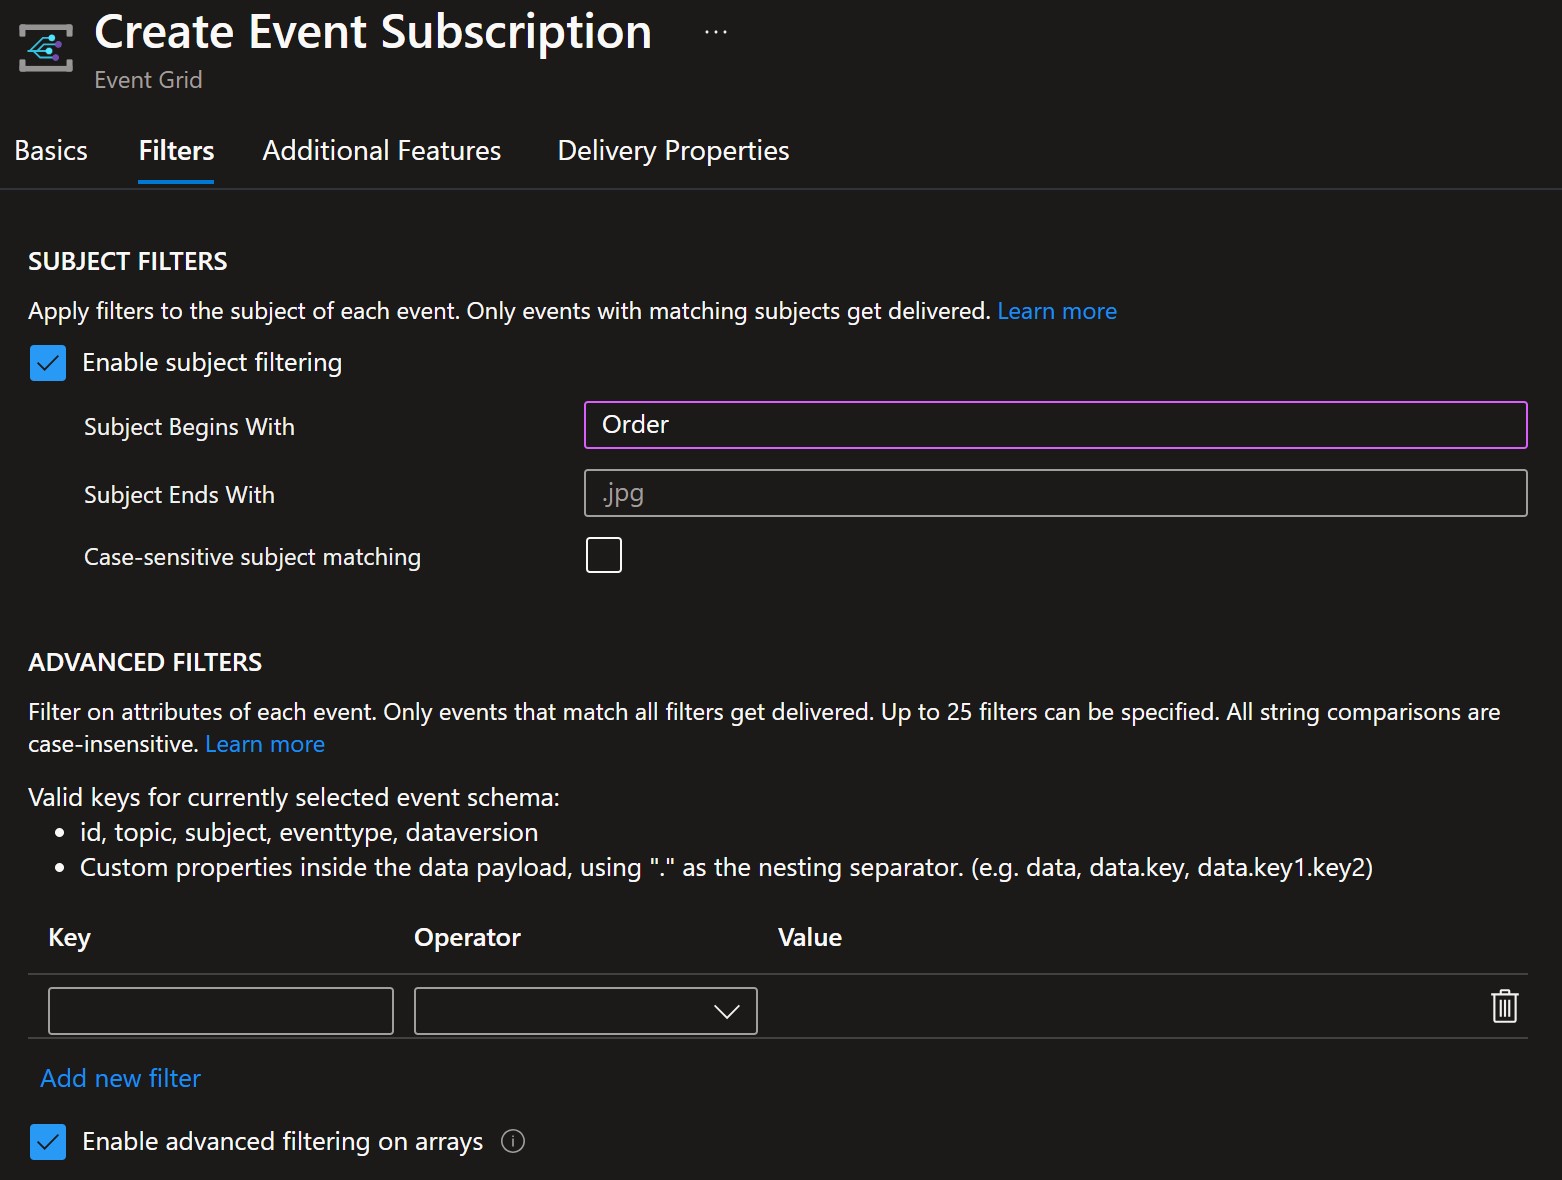 Subject Filtering
You can apply detailed event filtering by adding a custom filter and operator. Be aware that:
- Only events that match all filters will be delivered,
- Up to 25 filters can be set,
- String comparisons are case insensitive,
- For Event Grid Schema only the following keys are valid: id, topic, subject, eventtype, dataversion, Custom properties inside the data payload, using “.” as the nesting separator. (e.g. data, data.key, data.key1.key2).
Subject Filtering
5. Testing the setup
- Test with filter “Subject Begins With : Order”
- Run the EventPublisher project to publish one (1) event with subject “Order.1234.Created”.
- In the portal We can see one event published and one event delivered:
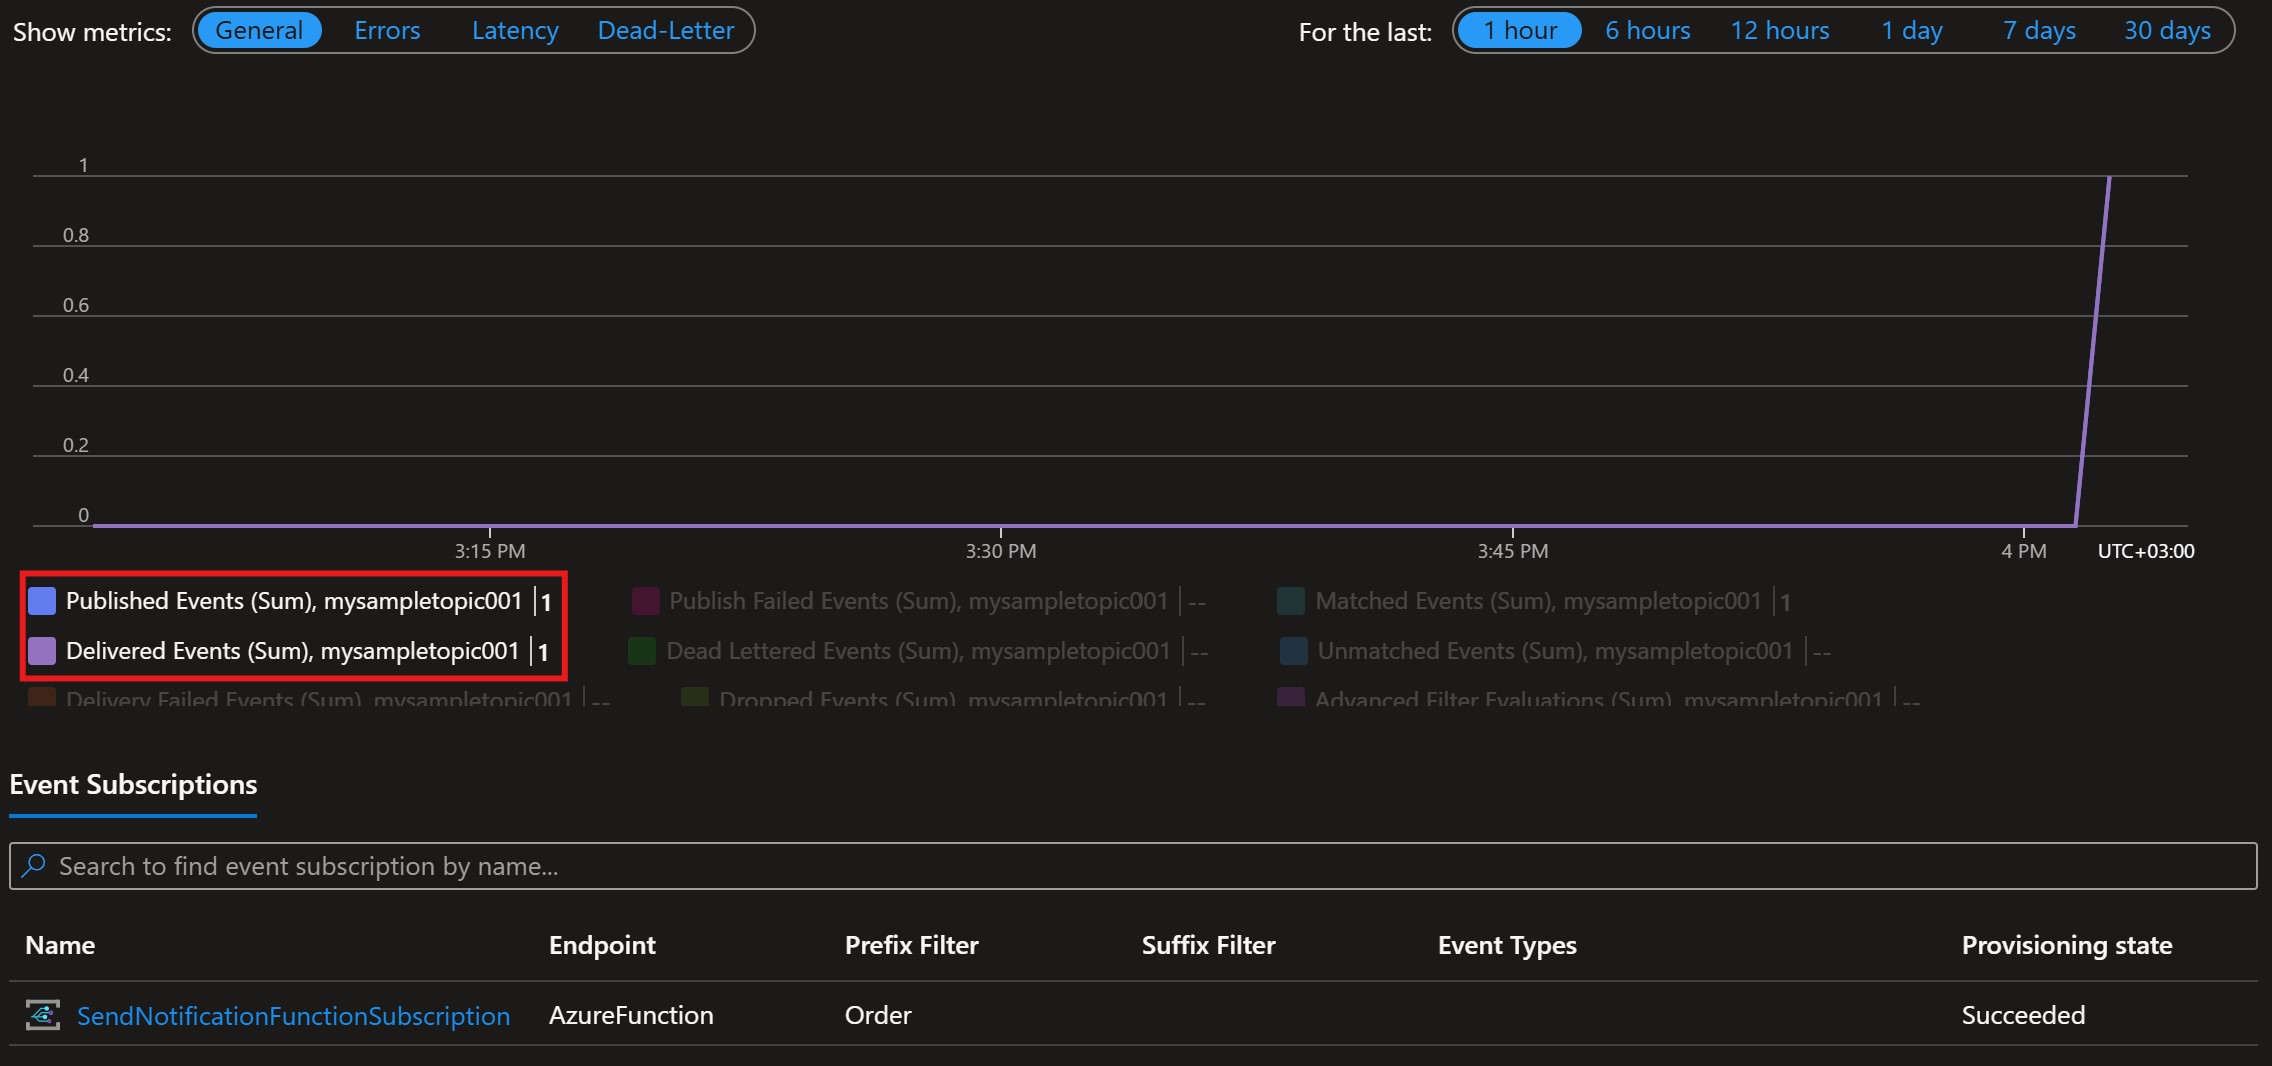 Event published with one filter
- Test with two (2) filters “Subject Begins With : Order” and “data.id - Number is greater than : 10”
- Edit the event subscription, and add a new filter in the
Advanced Filtersection: Data property filter
 - Run the EventPublisher project to publish two (2) events within a batch.
- First event subject: “Order.7.Created”, id: 7
- Second event subject: “Order.42.Created”, id: 42
- In the portal we can see that while three (3) events where published (two from current test + one from previous run) only two where delivered (one from current test + one from the previous run). The second event did not get delivered since it failed the “data.id - Number is greater than : 10” filter:
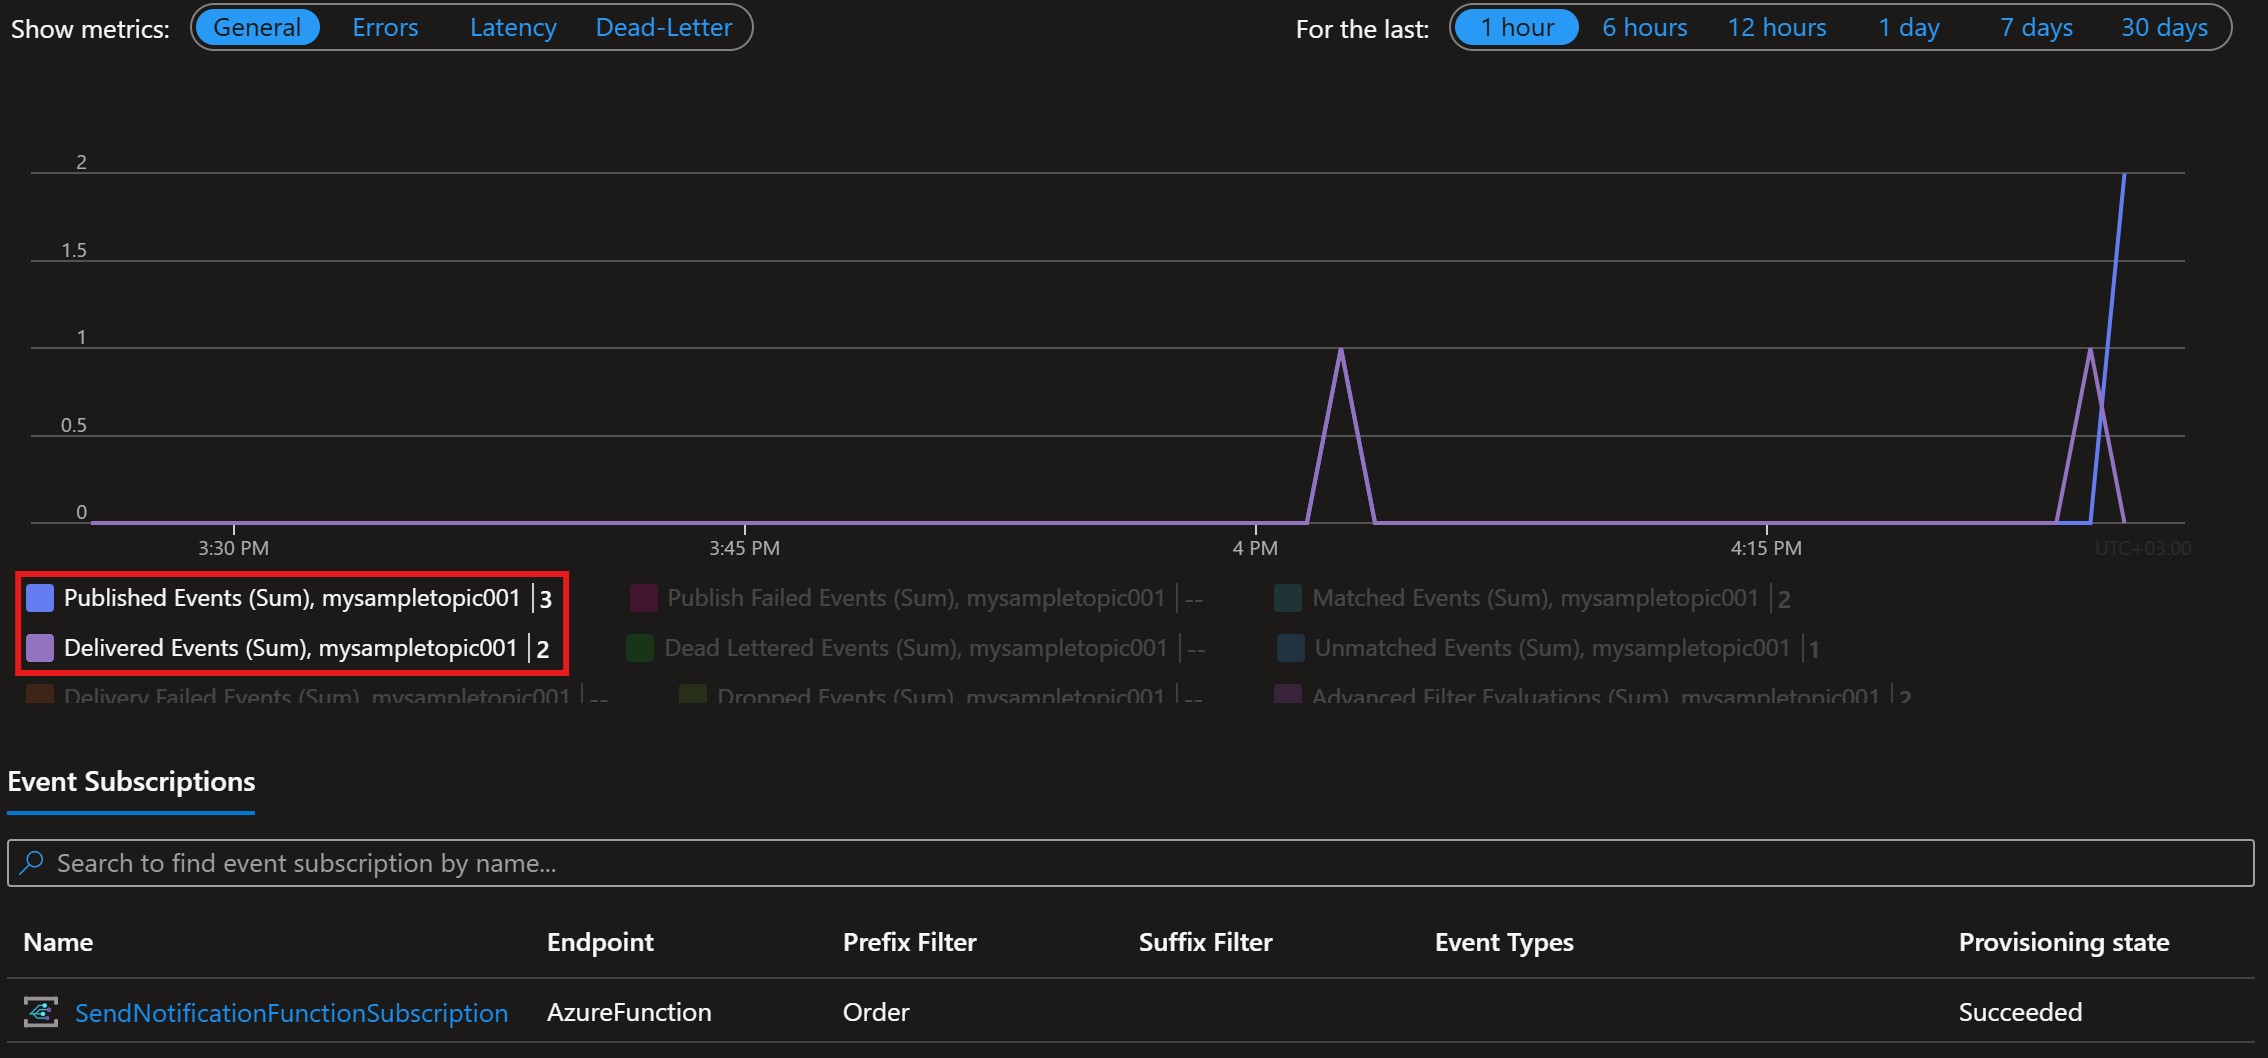 Event published with two filters
- Edit the event subscription, and add a new filter in the
Conclusion
By setting up an Azure Event Grid Topic, creating a .NET Core application to publish events, and creating an Azure Function to handle those events, we have implemented a decoupled, event-driven architecture. The use of filtering ensures that each Azure Function only processes the relevant events, making the system more efficient and manageable.
This setup provides a scalable, responsive, and flexible architecture that can easily be extended to include more event sources and handlers as the system evolves. Azure Event Grid makes it simple to build and manage such event-driven systems, ensuring reliable and efficient event processing.